i-doit MCP#
The i-doit MCP add-on connects your IT documentation to AI clients that support the Model Context Protocol (MCP). An AI assistant can then answer questions about your CMDB in ordinary language, for example "Which servers do we have in Hamburg?" or "Where is LAPTOP-42 located?".
The assistant always works with the permissions of the person its access token belongs to. It never sees or changes more than this person could in i-doit itself. Out of the box, access is read only. Writing has to be switched on explicitly, see Write access.
Requirements#
Check before installing
- i-doit 39 or newer. The address the AI client connects to (
src/mcp.php) is part of i-doit 39. - The i-doit API add-on, installed and active. Without it, category data cannot be read. Object types, the search and the general data of an object work without it.
- The JSON-RPC API switched on for the tenant: Activate JSON-RPC API under Administration → Add-ons → JSON-RPC API has to be set to Yes. While it is off, every request of an AI client is refused.
- An AI client that supports MCP over HTTP.
Apache with AllowOverride None
The .htaccess file of i-doit 39 allows access to src/mcp.php and passes the Authorization header to PHP. If your Apache virtual host uses AllowOverride None and contains the rules of the .htaccess file directly, transfer these changes to your virtual host configuration and reload Apache. Otherwise the AI client cannot connect. The changed lines are shown in the virtual host example of the installation guide:
1 2 3 | |
1 2 3 | |
Installation#
The add-on is installed like every other add-on, see Add-ons. After the installation, you find it in the main menu under Add-ons → i-doit MCP with three pages:
- How to connect
- Access tokens
- Request log
Assigning rights#
Under Administration → User permissions → i-doit MCP, permissions for persons and person groups can be adjusted:
| Right | Purpose |
|---|---|
| Generate a client configuration | Open the How to connect page and generate a client configuration |
| Request log | View the request log (View) and clear it (Delete) |
| Manage access tokens | View, create, enable and disable access tokens (View, Edit) and delete them (Delete) |
| Grant write access to access tokens | Mark access tokens for writing or make them read-only again |
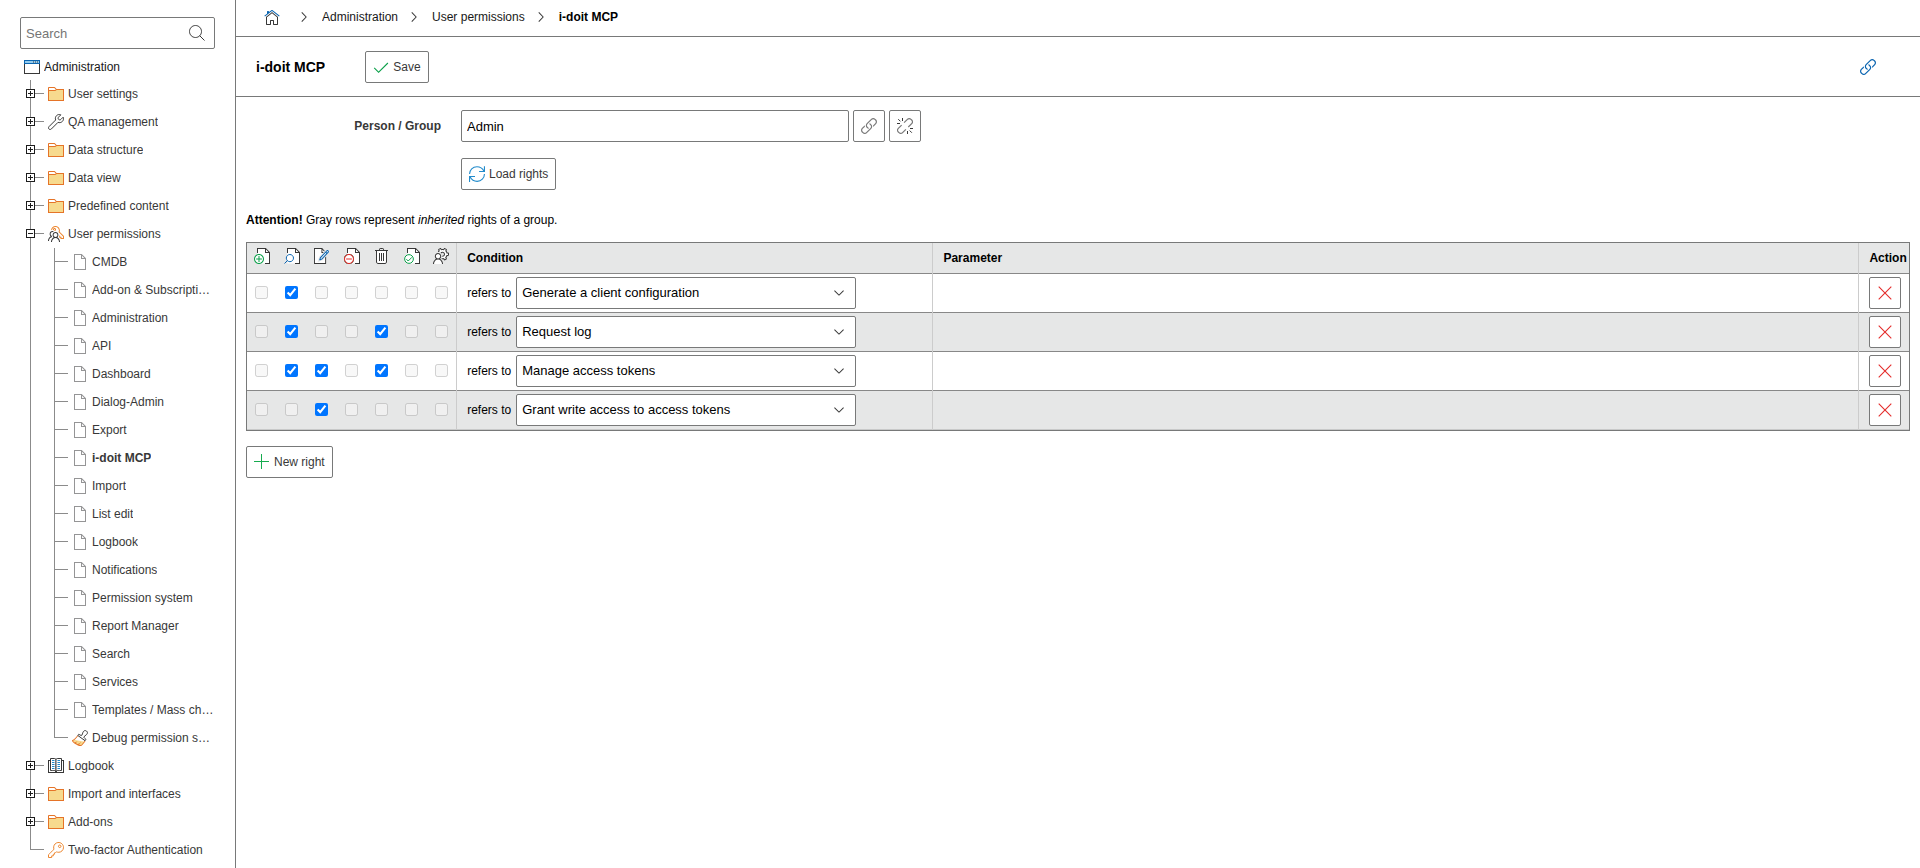
Holding an access token is what admits a client to the MCP server. There is no separate permission for it. To withdraw access, disable or delete the token.
Connecting an AI client#
Open Add-ons → i-doit MCP → How to connect. The page shows the section Connect your AI assistant in 3 steps, a Setup status and the Client configuration.
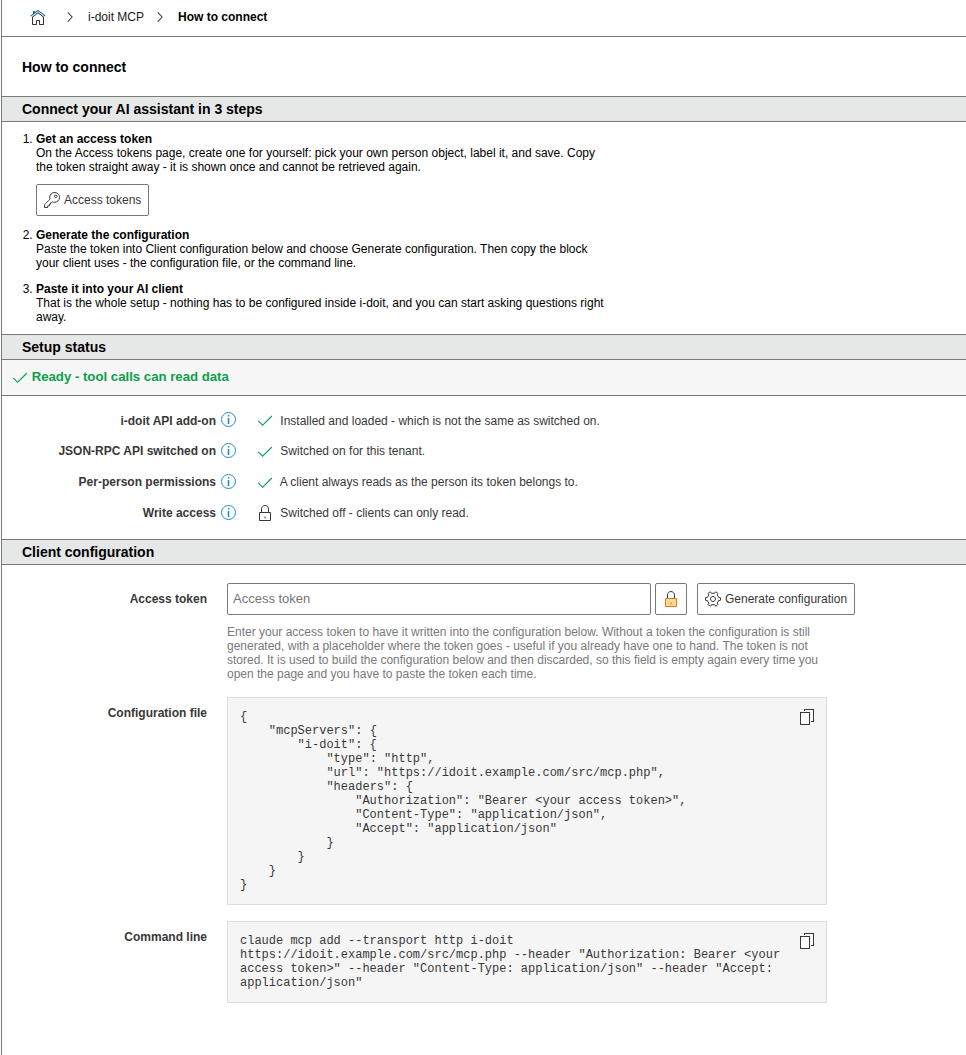
The Setup status shows four items:
- i-doit API add-on: whether the API add-on is installed and loaded. Without it, category data cannot be read.
- JSON-RPC API switched on: whether the JSON-RPC API is switched on for the tenant. While it is off, every tool call is refused.
- Per-person permissions: a client always reads as the person its token belongs to. Nothing has to be configured for this.
- Write access: whether AI clients may change data, see Write access. This is not a prerequisite, reading works either way.
Only when the first two items are met can tool calls read data.
1. Get an access token#
Create a token on the Access tokens page with New:
- Select the Person object the token belongs to. Only person objects can be selected.
- Optionally enter a Label, for example the device or client the token is used on.
- Save.
The new token is shown only once. Copy it right away. i-doit only stores a fingerprint, so the token cannot be displayed again later. If you lose it, delete the token and create a new one.
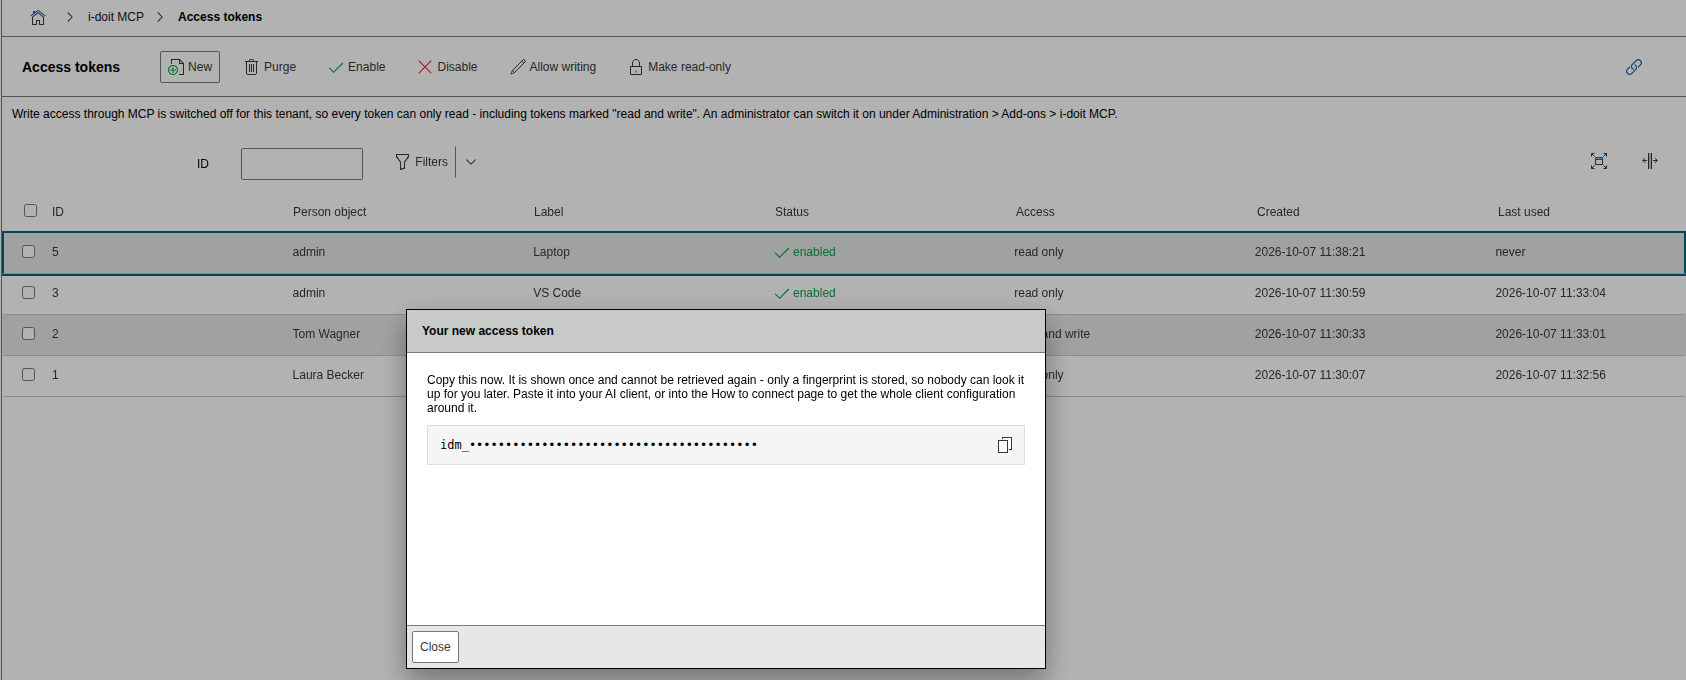
A token always belongs to the tenant in which it was created and only works there. The person of a token cannot be changed afterwards. Create a new token for another person instead.
2. Generate the configuration#
Paste the token into the Client configuration section and click Generate configuration. You receive two blocks to copy:
- a configuration file for clients that are configured via a file
- a command line for clients that are configured on the command line
Both blocks already contain the address of your i-doit installation and your token. The token field is optional. If you leave it empty, the blocks contain a placeholder instead of the token.
The page does not store the token. The field is empty every time you open the page.
The configuration file has this shape:
1 2 3 4 5 6 7 8 9 10 11 12 13 | |
The command line, here for Claude Code:
1 2 3 4 | |
Use the generated address
Always copy the address from the generated configuration. i-doit derives it from the address under which you reach the installation.
3. Paste it into your AI client#
Paste the configuration into your AI client. The client discovers the available functions by itself. There is no prompt field in i-doit: you ask your questions in your AI client.
Managing access tokens#
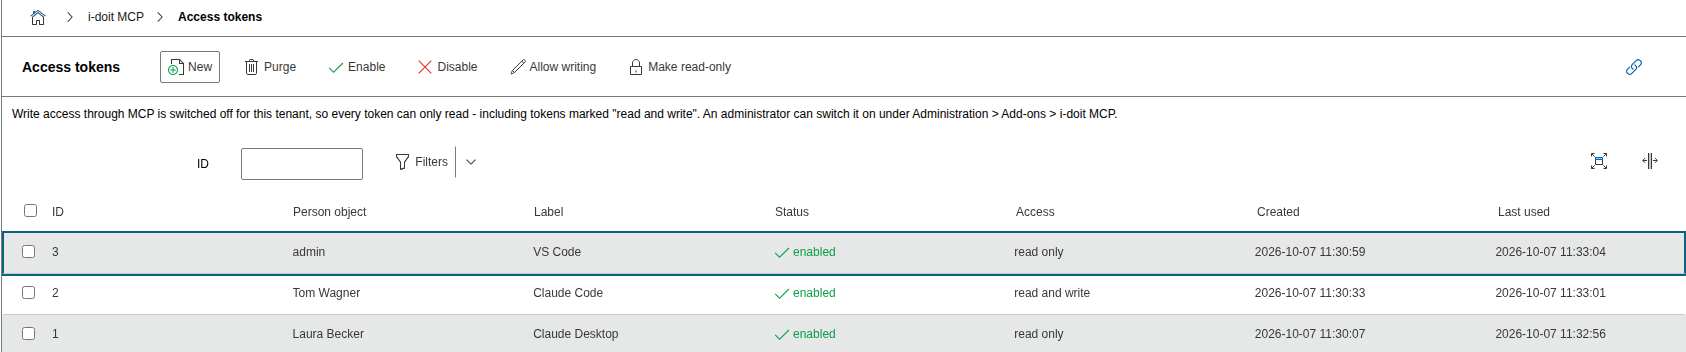
The Access tokens page lists all tokens of the tenant. Select one or more tokens and use the buttons in the toolbar:
- Enable and Disable switch a token on or off. A client with a disabled token stops working immediately.
- Purge removes a token for good. This cannot be undone.
- Allow writing and Make read-only set whether a token may change data. The column Access shows read only or read and write.
New tokens are always read only.
Write access#
Reading works without any further setting. Writing needs all of the following at the same time:
- The i-doit permission system is active: Permission system in the section Security of the tenant settings. It is active by default.
- Allow write access through MCP is switched on under Administration → Add-ons → i-doit MCP. It is off by default.
- The token is marked for writing (read and write).
In addition, every single change is checked against the CMDB permissions of the person the token belongs to, and it runs through the validation and the logbook of i-doit.
Purging data additionally needs Allow purge through MCP. This setting only takes effect while Allow write access through MCP is switched on as well.
Passwords are never returned to the AI client and cannot be written through MCP.
Settings#
The settings are located under Administration → Add-ons → i-doit MCP. Viewing and changing them requires the right for the system settings.
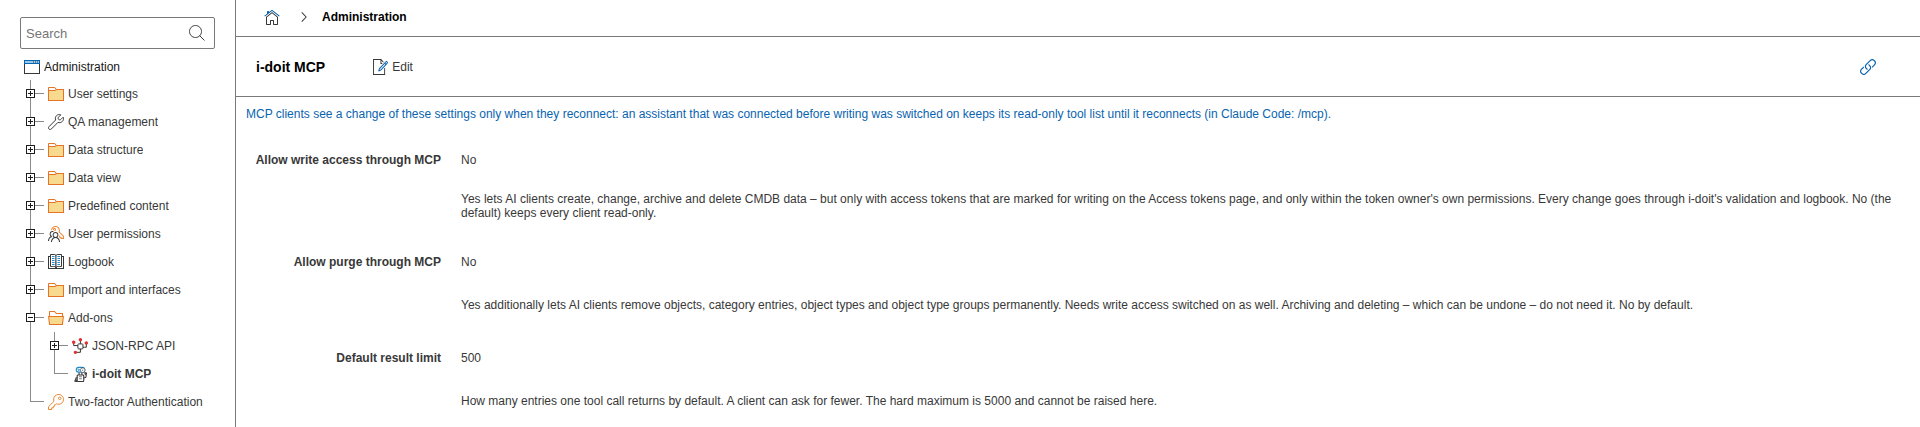
| Setting | Meaning |
|---|---|
| Default result limit | How many entries one tool call returns by default. Default value: 500. A client can ask for fewer. The maximum is 5000. |
| Allow write access through MCP | Allows tokens marked for writing to change data, see Write access |
| Allow purge through MCP | Additionally allows purging |
Reconnect the client
MCP clients only see a change of these settings after they have reconnected.
Request log#
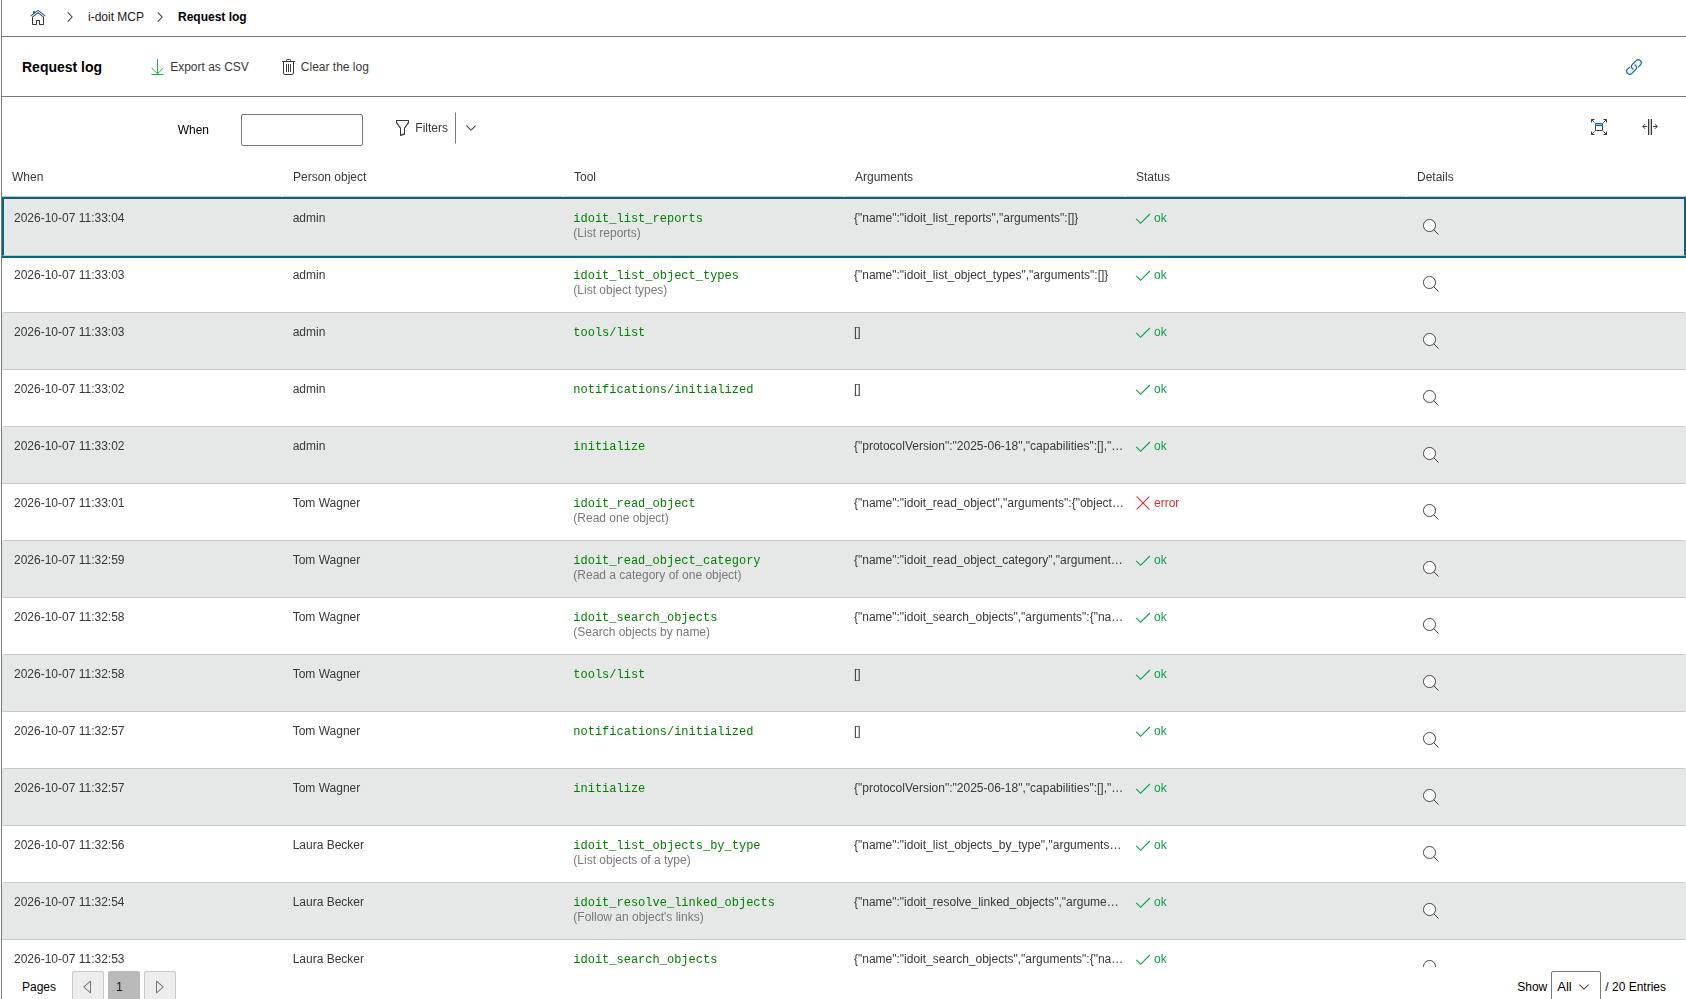
The Request log page lists every request of the AI clients with time, person, method and tool. Show details opens the arguments and, if any, the error of a request.
- Export as CSV downloads the complete log. The filter on the page does not apply to the export.
- Clear the log deletes all entries. This cannot be undone.
Releases#
| Version | Date | Changelog |
|---|---|---|
| 1.1.1 | 2026-10-09 | Initial release |